
Installing Communicare clients
Windows users with the required administrator permissions can install or upgrade Communicare clients.
The Communicare server is installed by Communicare Support at your site. You can install online clients on other computers that connect to the Communicare Server. The server and client must be on the same local network.
If you have an external service provider who manages your IT infrastructure, organise for them to install the Communicare client.
To install Communicare clients you must be on the same network as your Communicare server. You can’t be working remotely, unless you are on a Remote Desktop Server.
-
Right-click
\\Communicare_Server_Name\Install\CCare\Setup.exe
and select Run as Administrator.
Tip: If you aren’t sure of your Communicare server name, request it from your IT Team or Communicare Support.
- If there is a prompt, click Run.
-
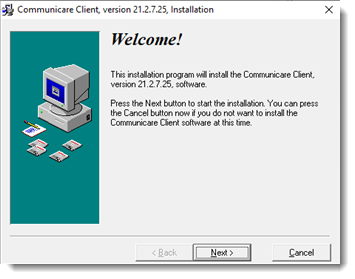
In the Welcome window for the Communicare client, click
Next.
- In the second Welcome window, click Next.
-
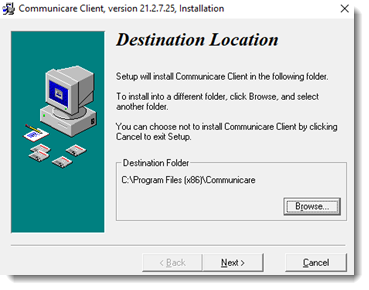
In the Destination Location window, accept the default
installation location of C:\Program Files (x86)\Communicare
and click Next.
-
If you are installing the offline client, set Communicare Data
Synchronisation client and enter the Data Synchronisation
installation password provided by Communicare Support. Alternatively, click
Next.

- In the Important Information window, read the information and click Next.
- In the Electronic End User License Agreement window, click Next to agree to the End User License Agreement.
-
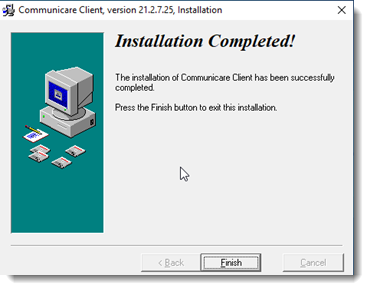
The installation begins and a progress bar is displayed. Installation will take
up to 10 minutes. When the installation is finished, the Installation
Completed window is displayed. To complete the installation,
click Finish.
- Communicare will offer to start. If you want to start using Communicare now, click Yes.
Communicare is installed to the location you selected and a Desktop shortcut is created automatically.
Upgrading Communicare clients
When the Communicare Server is upgraded, you must also upgrade the Communicare clients to the same version.
-
Ensure that no users have Communicare open on the computer.
Tip: Restart the computer before upgrading so that all Communicare clients for all users are closed.
-
Right-click
\\Communicare_Server_Name\Install\CCare\Setup.exe
and select Run as Administrator.
Tip: If you aren’t sure of your Communicare server name, request it from your IT Team or Communicare Support.
- Click Yes in any pop-up windows.
-
In the New Version Available window, click
OK.
The set up files are downloaded from the Communicare server. The installation then proceeds and updates the Communicare client.
After the Communicare client is updated, Communicare opens automatically at the Communicare Login window.