Investigation Requests
If you belong to a user group that has the Investigations system right enabled, from the Clinical Record you can request a pathology or imaging investigation.
Requesting investigations
A default claiming provider may be selected for your organisation in Organisation Maintenance. The default provider is an organisation-wide option and is available only for the encounter places where the provider has a provider number.
The process for requesting a pathology or imaging investigation is similar.
-
In a patient's Clinical Record, click:
-
 Pathology to add a pathology
investigation for a patient
 -
 Imaging to add
an imaging investigation for a patient
-
- In the Add Investigation Request window, from the Investigation Provider list, if there is more than one provider defined for your encounter place, select an investigation provider.
-
If you are not the Investigation Claimant for your encounter place, from
the Claiming Provider list, select the provider who
you would like to make the request on behalf of.
Staff other than those identified as Investigation Claimants for an encounter place can order investigations if Request on behalf of is enabled in Organisation Maintenance. The claiming provider list contains only providers who are Investigation Claimants for the current encounter place. A request cannot be submitted without a valid Provider number recorded in Communicare.
- In the short list of available investigations, select the required investigation and click >Add, or double-click the investigation. To add all items in a filtered list, click >>Add All. The investigations you have selected are listed in the Investigations Requested pane. These tests will be printed on the request form. To remove a requested item, click <Remove.
- If the investigation you want to request is not in the short list, in the Search Investigations field, enter a keyword, or two keywords separated by a space to find the investigation you require. For information about adding an investigation to the short list for future requests, see Creating new request types.
-
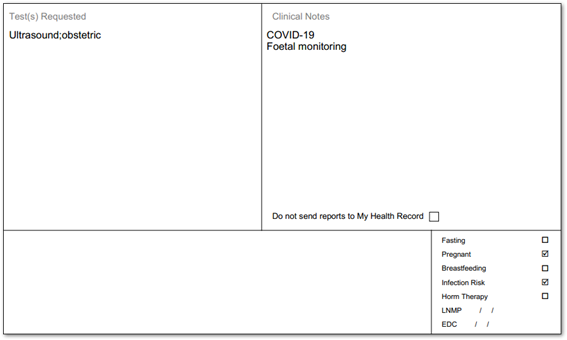
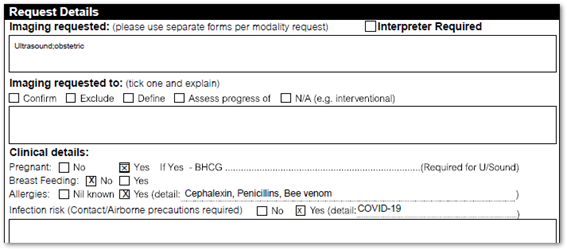
Set clinical options. For any options that you set, an
X is placed in the relevant box on the request
form. If an option doesn't exist on the printed template, the label is added
to the clinical notes format, for example,
Fasting.
- If your patient is fasting, set Fasting.
- If your patient is pregnant, set Pregnant.
- For imaging requests, if your patient is breastfeeding, set Breastfeeding.
- For imaging requests, if your patient is unwell and poses a risk to imaging staff, set Infection Risk. Add details about the infection to the text field.
- In the Copy To field, enter the names and details of any other providers the results of the investigation should also be sent to, other than yourself.
-
From the Investigation Reason list, select an
existing clinical item for the patient to which this investigation relates,
or click
 Clinical Item and
select a new clinical item.
- If an investigation must be performed urgently, set Urgent and in the Reply To field, enter your monitored phone or email details.
- If a patient's welfare is at risk, set Critical if result outstanding. The investigation will be given a higher priority in the report.
- From the Printing Format list, select a predefined print format. The format defaults to that specified for the Investigation Provider in the Address Book.
-
In the Clinical Notes field, add any extra
information that the lab or imaging practice needs to know. Carriage returns
are replaced with spaces.
Note: For most clients, clinical notes longer than 145 characters are truncated in the investigations template. If you are using a custom template, you may be able to include extra information.
- Do not send reports to My Health Record shows the patient's preference recorded in Patient Consents to Upload to My Health Record. This preference will be printed on the investigation request form. Communicare does not upload the request or result to My Health Record, irrespective of whether this option is set or not. This option is displayed irrespective of whether the My Health Record module is enabled or disabled.
- Click Print & Save.


For some health services, for imaging requests using templates that show allergies, any adverse reactions recorded in the clinical record are also transcribed into the Allergies field. If no adverse reactions are recorded, Allergies is left blank. If you have recorded Nil Known adverse reactions in the clinical record, Nil known is checked on the imaging request form.
To print the request, click Print.
Requests are displayed as clinical items on the Detail tab: Class of Ix Request; or Topic of Investigations. Select a request to display its details in the right pane.
To view requested tests that have not had a result matched to them, run the reports in .
Next, match and review results.
Printing and Reprinting Requests
- On the Progress Notes or Details tab, double-click the request to open it.
- Make the required changes.
- Click Print & Save.
To reprint a request, right-click on the request and select Print Investigation Request.
Creating new request types
If you belong to a user group with the Reference Tables system right right enabled, you can update the short list of investigations displayed in the investigation request form.
- Select .
- Set Short Listed for any test you want added to the list.
- Click Save.
If a keyword does not find the correct test, go to and add an appropriate keyword.
Bulk Assignment
When this option has been selected as a system parameter (see System Parameters - Clinical), for plain paper pathology request forms only a label is appended to the top right of the form indicating that this is a bulk assignment request and where the requester's signature is normally added is a label indicating that a signature is not required. This option should only be used with the express permission of all pathology labs used at the health service and should not be enabled if the feature to use another claiming provider is enabled.
