
Working with the Appointment Book
Use the Appointment Book to add sessions, book and change appointments, and check patient's in.
 Appointments Book.
Sessions
You can view only those appointment sessions created from templates with an Encounter Program to which you have access. Similarly, when adding Appointment sessions, only templates with Encounter Programs you have access to, or no Encounter Program specified, are available. For more information, see Appointment Session Templates.
You can insert a session with a type of Manual for any day. Weekly sessions can be inserted manually only for the day of the week for which they have been defined.
-
In the Appointment Book, click
 Insert.
- In the Session Templates List, select the session you want to insert.
-
Click
 OK.
OK.
You can now add appointments.
If your provider needs time set aside without
any patient bookings, that is not already included as a provider planned absence, select a
timeslot and click  Reserve. If the provider no longer needs this time set
aside, select the reserved timeslot and click
Reserve. If the provider no longer needs this time set
aside, select the reserved timeslot and click  Unreserve.
- In the Appointment Book, reschedule any appointments. See Cancelling and rescheduling appointments manually .
- If you are cancelling part of a session,
select the first appointment you want to cancel
and click
 Split and in the
Confirm window, click
OK.
Split and in the
Confirm window, click
OK. - In the Appointment Book,
click in the part of the session or the session
that you want to cancel and click
 Cancel
Session.
Cancel
Session. - In the Session
Cancellation window, type
session and click OK.
The session or part of session is removed from the appointment book.
Booking appointments
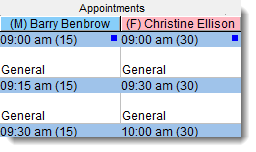
In this example, Dr Benbrow's appointments are 15 minutes long, while Dr Ellison's appointments are 30 minutes long. The time of the appointment and its length are displayed in the blue banner for each timeslot.
- In the Appointment Book, if you have multiple sites, in the Filter Place & Mode pane, select a mode and place. This is important when multiple sites or separate waiting rooms are used. If you select an Administrative Encounter Place, appointments at all Service Encounter Places that belong to it are displayed.
-
If your health service books appointments from more than one workstation, to update
your display to the latest appointment details, click
 Refresh or press F5.
-
Search for a free appointment slot:
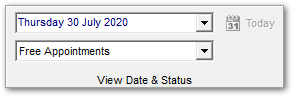
- To search for a free appointment for today or
a specific day, in the View Date &
Status pane, select Free
Appointments. The Appointment Book
displays only free appointment timeslots.
- If there are no appointments available today,
or for the selected date, to search for the next
available appointment:
- In the Free Appointment
Search pane, select which providers
(all, female or male) and the type of appointment
the patient requires.
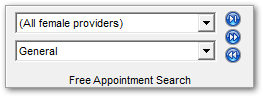
- Click
 Play to go to the first day with available
appointments.
Play to go to the first day with available
appointments. - If there are no suitable appointments on that
day, click
 Forward to go to the next day with
available appointments or
Forward to go to the next day with
available appointments or  Back to go to a previous day with
available appointments.
Back to go to a previous day with
available appointments.
- In the Free Appointment
Search pane, select which providers
(all, female or male) and the type of appointment
the patient requires.
Tip: To return to today's appointments, click Today.
 - To search for a free appointment for today or
a specific day, in the View Date &
Status pane, select Free
Appointments. The Appointment Book
displays only free appointment timeslots.
-
If the patient requires a double appointment,
select two adjacent timeslots and click
 Merge.
Tip: If you later need to make this timeslot two single appointments again, select it and click
Merge.
Tip: If you later need to make this timeslot two single appointments again, select it and click Unmerge.
 -
Select a free appointment timeslot and click
 Book or press
CTRL+Enter.
Book or press
CTRL+Enter.
-
In the Select patient to book
appointment window (Patient search),
enter the name of the patient for whom you're
booking, select that patient in the list and click
Select
Patient.
If you are booking for a new patient, first search for any existing record, then click
 New Patient.
 -
The appointment is summarised in the
Appointment Details window.
Complete any extra booking information and click
Save.
For more information, see Appointment Details.
Checking a patient in
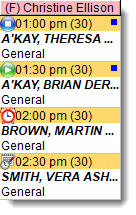
 Vera's appointment is booked but she has not yet arrived
 Martin is checked in and is waiting
  Brian is seeing a provider (service in progress)
 Theresa has seen a provider and the service finished
- In the appointment book, select the patient.
-
Click
 Check In.
- In the Service Record window, the date and time of arrival are automatically listed. Record any other information as required, including setting the priority. For more information, see Service Record - Detail.
-
Click Save.
The patient's status is changed to Waiting.
The other appointment status changes occur automatically when the service is started from the service record and the clinical record is closed.
To open a patient's biographic information from the appointment book, select the
patient's appointment and click  Biographics.
To view a list of all upcoming appointments for a patient, click  Services and search for the patient. Deselect
Future Only to view all appointments.
Services and search for the patient. Deselect
Future Only to view all appointments.
To take payment when a service is finished and the patient returns to reception, in the Service Recording window, double-click a patient and select Edit Service Details.