
Reviewing and matching results
Use the tab to review automatically matched incoming patient results and match results manually that couldn't be matched automatically.
The pathology lab software sends results for download every hour or so. Results are imported by Communicare within a minute of being downloaded.
- HTML
- Text
No supported result format (plain text or PDF) sent by investigation provider- Medicare number (prefix), date of birth and sex
- Preferred surname (exact), preferred given names (prefix), date of birth and sex
- Any surname soundex, any given names soundex, date of birth and sex
The matched patient is approved by a clinician when reviewing the result. Results can be reviewed in the Match and Review Results window or from the patient's clinical record.
If Communicare is unable to match a result to a patient, the results must be reviewed and matched manually. Similarly, any requests with the same reference number as the result are listed in the Match and Review Results window for manual matching.
-
In the Documents and Results window, on the
Investigation Results tab, double-click a result.
Results are displayed in the left pane and the patient and request information
in the right pane.
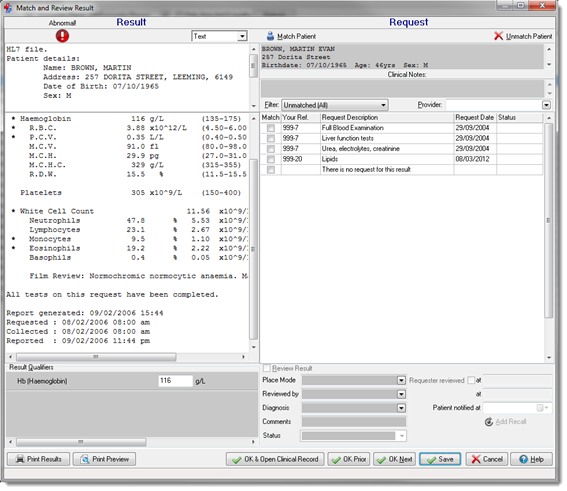
If the result is available in more than one format, select your preferred display format from the list.Tip: To filter the results, set filter information above the table. For example, to review requests made by you, from the Provider list, select your name. -
If the result has been matched to the correct patient, go to step 4. Otherwise,
match the result to a patient:
- In the Match and Review Result window, click
 Match Patient.
 - In the Select Patient window, search for the patient to whom the result might apply by name, date of birth or Medicare number. If you cannot find the patient, add the patient to the database as a Transient Patient so that you can review the result. Click New Patient and add the patient as normal. The patient details are inserted automatically into the pathology results
- In the Match and Review Result window, click
-
In the request list, match the result to a request:
- Select all requests that apply to this result. You may select more than one request if the result contains data for more than one request. You may also select a request that has previously been matched to another result if this result is subsequent to that initial result.
- If the investigation was not requested using Communicare, select There is no request for this result.
- If the lab has not returned the reference number sent with the request, unmatched requests from the past six months are listed. Change the filter to All to display all past requests with a status of either Matched (the request has been matched to at least one result) or Pending (the request has not yet been matched to a result).
-
Review the results, either:
- Continue to review the results here:
- Set Match.
- Set Review Result.
- Check that your encounter place and mode are correct.
- If you requested the investigation, set Requester reviewed, otherwise, from the Reviewed by list, select your name. A date is added to the appropriate field and the result changes status to Reviewed.
- If the investigation results in a diagnosis, from the Diagnosis list, select a diagnosis.
- If the patient has been notified of the results, in the Patient notified at field, add the date when they were notified.
- To add a recall for the patient, click
 Add Recall
and complete the recall information. See Recalls for more
information.
Add Recall
and complete the recall information. See Recalls for more
information. - The status of the investigation result is imported from the pathology file, but you can also update the status manually. To update the status, from the Status list, select the required status.
- In the Comments field, enter any further information.
- Review the results in the patient's clinical record instead:
- Set Match.
- Click OK & Open Clinical Record.
- Complete steps b-i above.
- Continue to review the results here:
- Click Save. Alternatively, click OK Prior or OK Next to review the previous or next result.
After a result is matched to a patient, you can review it in the patient's clinical record.

- To display a summary of the investigation in the right pane, select it in the result list in the left pane
- To open a result, double-click Investigation Result or right-click the result and select Edit Investigation Result
If you didn't select all requests associated with the result, requests that are not marked as having had the result received will stay on the report for outstanding requests, .
You can short list a number of clinical items recallable from the Match and Review Result window. Ask your administrator to assign the keyword $IxRecall to the required items.
Adding a manual result
Manual results, for example, results returned in paper format or verbally can also be recorded in Communicare for an existing request.
- On the tab, right-click the request to which you want to add a result and select Add Manual Investigation Result.
- In the confirmation window, click Yes.
- In the Match and Review result window, in the left pane, enter the results.
- Set Review Result and provide any other information required, such as from the Status list, select Interim.
- A comment of Manual investigation result is included in the Comments field. Add more information if required.
- Click Save and Yes.
The result is listed on the tab prefixed with <Reviewed> and a comment of Manual investigation result.
Deleting results
You can delete results that have not been matched to a patient.
 Delete/Undelete.
If a result is mistakenly deleted, change the Status
filter to show Deleted results and click Delete/Undelete again.
Reviewing and inserting result qualifiers

Numeric and true/false qualifiers are supported. Numeric qualifiers receive the numeric value coded by the laboratory in the result. True/false qualifiers receive the Abnormal flag coded by the laboratory in the result. This means that the qualifier will record whether the lab declared the result to be abnormal, not the actual text returned by the lab.
Qualifiers that were automatically imported will be pre-filled. This means that they can be modified if absolutely necessary. Qualifiers that could not be pre-filled but are still returned in the result can be inserted.
Any OnQualifier recall rules will fire when the reviewed result is saved.