
Progress Notes
Progress Notes are available for all providers for each service.
The Progress Notes tab displays historical services on the left, and enables you to edit your current note and view the to-do list on the right-hand side.
Historical Notes
Historical notes are displayed with the newest services first in reverse chronological order (by date). Contacts by providers within each encounter are displayed in chronological order from top to bottom.
Each encounter is separated by a header which groups together the contacts for that encounter. The header displays the day, date and place of the encounter.
Each contact is separated by a header which displays the provider name, speciality, time of the contact, reason for encounter (if available), <Amended> if a progress note was changed, and <Deleted> for older versions. Below the header the progress notes for that contact are displayed.
The note currently being edited on the right-hand side is not displayed below its contact header
in the historical notes list, but is identified with the  Current Contact
icon.
Current Contact
icon.
The historical notes list is automatically refreshed every 60 seconds to display any changes to a patient's notes made by other providers.
Adjusting the detail shown in the historical note list
You can adjust the level of detail displayed in the historical note list. Changes to the detail level are saved between sessions on the same computer.
To adjust the detail level for all historical notes, using the  Detail
controls, either click a particular detail level, or click
Detail
controls, either click a particular detail level, or click ![]() Plus
or
Plus
or ![]() Minus.
Minus.
To adjust the detail level for each individual contact's notes, on the left of the contact header, click ![]() Plus or
Plus or ![]() Minus.
Minus.
- To increment the detail level for all contacts' notes belonging to that encounter, click the service header. Continue to click the service header to increase the detail level.
- To increment the detail level for one contact's notes, click their contact header. Continue to click the contact header to increase the detail level of their notes.
- For a clinical item, to expand the detail level shown for that item when at detail level 3, double-click on that clinical item.
| Detail Level | Description |
|---|---|
| 1 | Displays only the encounter and contact headers. |
| 2 |
Displays three lines of text of the contact note. The text
displayed can be a combination of any of the following:
|
| 3 | Displays all free text and clinical items in the note at full size. However, each clinical item displays only the first line of its description. |
| 4 | Displays all free text and clinical items in the note at full size including the full details of each clinical item. |
| 5 |
Displays the full note including all clinical items and their qualifiers. Deleted items are also displayed at this level. Deleted progress notes are shown at this level. Where a progress note has been amended, any earlier versions are also listed under the current version. Deleted notes are displayed in grey text with <Deleted> appended to the contact header. A footer for each note displays audit fields for the last user that modified the note, the time and date of the modification, and the viewing rights assigned to the note. |
Clinical Information
Clinical information recorded during an encounter is added to the Progress Notes tab.

- Icon showing the type of information, such as clinical item, or medication
- Date of service
- Type of information, such as:
- Clinical item
- Medication details
- Type of investigation
- Type of imaging
- Letter
- Recall
- Comments added to the clinical item
- If the clinical item has been added to the Main Summary tab, the word Summary
- If the clinical item has been added to the Obstetric Summary tab, the word Obstetric Summary
As you add items to the patient's record, they are added to the bottom of the current note. You can't edit clinical items in the note, but you can type text before and after the item if required.
If you have the appropriate system access rights, such as Prescribing or Investigations, you can modify an item. To edit an item, double-click it in the current progress note to open it, and edit as required.
You can edit a clinical item from another service only if it has not been deleted, you have sufficient rights to edit it, and another user does not currently have it open. To edit a clinical item from another service, click and drag it to the current note. Modified items are marked as <Modified>. The original clinical item text will remain unchanged.
Deleted clinical items cannot be edited. Deleted items are marked as <Deleted> and the text is greyed out.
Viewing Progress Notes
You can tag a progress note for a particular discipline, such as Psychological, and limit the visibility of the progress note to other users.
- Users who do not have any viewing rights cannot see progress notes.
- Users who do not have the viewing right attached to a progress note cannot see that progress note, but can see items within the note they have the right to see.
- Users who do not have the viewing right for an item that is displayed in a progress note, cannot see that particular item, but can see the note and other items they do have the rights to see.
- Users who do have the viewing right for an item that is displayed in a progress note, can always see that item, regardless of other rights.
To tag a progress note, from the Viewing right (excluding Clinical Items) list, select the required tag.
Filtering
By default, historical progress notes from all providers, encounter places and modes, and specialties are displayed. You can limit the notes displayed by using one or more filters. You can filter by Provider, Encounter Place, Encounter Mode or Speciality. The filters are reset to the default when the next clinical record is opened.
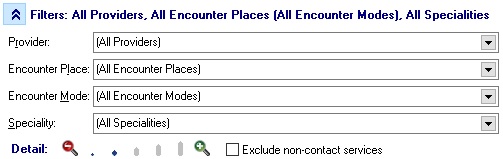
- Click
 Filters.
 - Choose one or more filters from the following lists:
- Provider - select a provider from the list
- Encounter Place - select an encounter place within your organisation from the list
- Encounter Mode - select an encounter mode from the list
- Specialty - select a specialty from the list
- To set the Encounter Mode to (All Client Contact Modes), set Exclude non-contact services.
To clear the filters, select All Providers, All Encounter Places, All Encounter Modes, and All Specialities from each list.
Editing Service Details
To edit the current service details, click on the service or contact header buttons above the current progress note. See Service Record Maintenance for more information.
Editing a previous contact
You can change the active contact to edit a previous contact note if you were part of that past service.
To change to another service, drag and drop any of the contact or service headers onto the current note. Communicare checks if you were part of that service and if you have the appropriate permissions before changing to that contact note. If you were not part of the past service, you won't be able to switch or edit that the previous progress note. You will be prompted with what to do with the service you are changing from. For more information, see Service Exit.
Once a service has been amended, the contact header is displayed in the Historical Notes prefixed with <Amended>. Earlier versions of the progress note may also be viewed in the history when the detail level is set to 5.
Spell Check
An Australian English spell checker is included with the current progress note, which automatically checks for spelling errors while you type and underlines incorrectly spelled words with a red wavy line.
To run the spell checker on the note manually, right-click the note and select Spell Check.
To Do
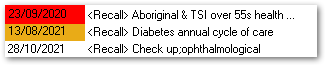
- Scheduled - white
- Due in the next 30 days - amber
- Overdue - red
For more information about recalls, see Recalls.
Right-click menu
Right-click an historical service or current service to access various printing and editing options.
To configure the printing options, contact Communicare Support.