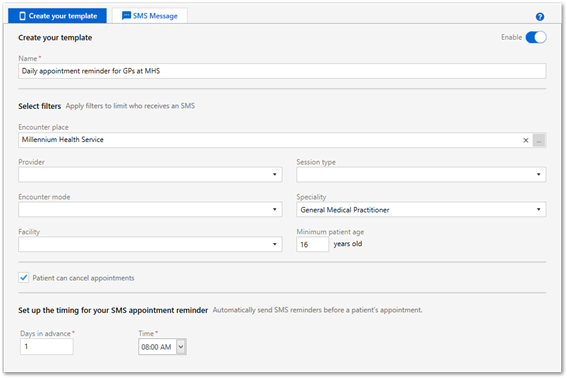
Create SMS template
Add an SMS appointment reminder template for each different appointment reminder and frequency that you want to send.
To set up and manage SMS reminder templates, the Communications module must be enabled and you must belong to a user group with the SMS Administration system right.
- Select .
-
In the SMS Appointment Reminder window, click
 New Template.

- On the Create Your Template tab, in the Name field, enter a descriptive name for the template.
-
Optionally, add one or more filters to limit the recipients of the appointment
reminder:
- In the Encounter place field, click the
 ellipsis and in the Select an Encounter
Place window, select the encounter place for which you
want to send SMS appointment reminders and click
OK.
 All enabled encounter places are listed. For grouped encounter places, if you select the parent encounter place, SMS appointment reminders are also sent to the dependent encounter places.
- If you want to restrict the SMS reminder to patients only of a particular provider, from the Provider list, select that provider. Only active providers are listed.
- If you want to restrict the SMS reminder to patients only attending a particular session, from the Session type list, select that session.
- If you want to restrict the SMS reminder to patients only assigned to a particular encounter mode, from the Encounter mode list, select that mode.
- If you want to restrict the SMS reminder to patients only assigned to a particular speciality, from the Speciality list, select that speciality.
- If you want to restrict the SMS reminder to patients only attending a particular facility, from the Facility list, select that facility.
- If you want to restrict the SMS reminder to patients of a particular age and older, in the Minimum patient age field, enter an age in years. All patients who are this age or older will receive an SMS appointment reminder.
- In the Encounter place field, click the
- To allow patients to cancel appointments automatically by replying N or No (by default) to the appointment reminder SMS message, set Patient can cancel appointments.
-
Set up the timing for your appointment reminder. By default, the reminder is
scheduled for 8am, 1 day before the booked appointment.
- In the Days in advance field, set the number of days before the booked appointment that this reminder is sent.
- In the Time field, enter the time at which you want the reminder to be sent.
-
On the SMS Message tab, in the SMS
Template field, enter a message.
For more information, see Compose SMS message.
- On the Create Your Template tab, set Enable.
- Click Save.
Your new template is listed in the SMS Appointment Reminder window.
If you enabled the template, the template is run at the next scheduled time by CCareQueue_Communications and SMS messages are sent using Telstra Health's SMS gateway (TH Messaging), to all patients who meet the criteria specified in the template. The template does not consider any user, system or program rights.
A new SMS Message clinical item is created in the clinical record of each recipient, on the Detail tab. The status of the SMS message is displayed in the SMS Send Status field, initially with a status of Pending. The SMS message is sent when the CCareQueue_Communications service next runs. The message status in the clinical item is updated automatically when confirmation is received that the message has been sent or has failed, or if the patient has replied.
- If you set Patient can cancel appointments, a negative response from a patient cancels their appointment. A confirmation of the appointment or no reply are indicated in the Appointment Book and Service Recording windows.
- If you did not set Patient can cancel appointments, replies from the patient are recorded in the Appointment Book and Service Recording windows. Cancel or reschedule appointments manually.
- Replies from the patient are recorded in their clinical record on the Detail tab.
