
Finalise Prescriptions
You can finalise prescriptions to send for ePrescribing, print or update without printing out prescriptions.
If you are using ePrescribing, tokens for finalised ePrescriptions are sent to the patient or their carer using SMS or email, via a central repository, such as eRx. Prescriptions are also added to the Active Script List unless consent is withdrawn.
To use the ePrescribing options in V22.1 and later, your health service, prescribers and local pharmacies must be prepared. For more information, see ePrescribing.
| Type | Format | Description |
|---|---|---|
| Printed | Printed Prescription | A traditional paper script is printed for you to hand to the patient. |
| ePrescribing options - visible only if ePrescribing is enabled | SMS ePrescription | A token is texted to the patient's mobile phone. They present this token at the pharmacist. |
| Email ePrescription | A token is emailed to the patient's email address. They present this token at the pharmacist. | |
| Printed ePrescription Token | The token is printed for you to hand to the patient. This is not a prescription and does not require a signature. Use this option if the patient does not have a smart phone or email address, or if the token is not transmitted successfully by other methods. | |
| Record updates only | Don't Print or Send | For updates to medications only. No token is generated and the prescription is not printed. |
-
In the clinical record, on the tab, click
 Finalise Prescriptions.
Tip: Alternatively, on the Medication Summary tab or Detail tab, right-click on a medication and select Finalise prescriptions.
Finalise Prescriptions.
Tip: Alternatively, on the Medication Summary tab or Detail tab, right-click on a medication and select Finalise prescriptions. - In the Finalise Prescriptions window, all current medications that have not been finalised or printed are listed and selected. If medication requests are enabled and Create Medication Request by Default is set, regular medications are added to the medication request instead (for more information, see ). In the Create Prescriptions step, deselect any medications in the table for which you don't want to create a printed or electronic prescription.
-
From the
Patient Prescription Format options, select the way
in which you want the prescription to be delivered to the patient, their carer
or the pharmacy, if at all (see Table 1).
Tip: Patients must have a IHI number to receive ePrescription tokens. If the patient's preference for how they want to receive their scripts is selected inFor SMS or email options, the information included in the patient's biographics, if any, is displayed. Customise this information for only this prescription if required: phone numbers must be 10 or 11 characters; email addresses must be valid. Any new information you add here is not saved back to the patient's biographics.
 tab, Prescription Format, this option
is selected. If there is no option selected, Printed
Prescription is set by default.
tab, Prescription Format, this option
is selected. If there is no option selected, Printed
Prescription is set by default. -
If medication requests are enabled for your health service, and you want to
create a medication request, you
can either do so now or after you finalise the medications from the
Medication Summary tab.
Tip: You cannot create medication requests for back-dated services.
If you want to create a medication request now:
- Click Finalise.
-
If
you selected an ePrescribing option (see Table 1), patient, prescriber and
medication details are displayed in the Preview
Prescription window.
Tip: This process simulates the paper prescribing process, where you check the printed prescription before signing it.
Details for the prescriber who is finalising the prescription are listed, regardless of whoever initially prescribed the medication.
- To step through and review each prescription, click Next.
- To complete the prescription, click Send All.
If you find something you want to update, click Cancel Review to return to the Finalise Prescriptions window.
- Sends a token for each medication to the patient or their carer using separate SMS messages or emails
- Prints a separate token for each medication
- If the patient has consented, adds the medication to their Active Script List
The ePrescription Summary shows whether the ePrescriptions have been successfully sent and allows you to resend the ePrescription. If the ePrescription cannot be created, you can print the prescriptions as paper prescriptions. Where a paper prescription is created because the ePrescription failed, the medication is still sent to eRx as a paper prescription and an eRx barcode is printed on the paper prescription. The paper prescription is not an ePrescription so the prescriber must sign the script. If you cancel the transmission of the ePrescriptions, all ePrescription tokens are printed with a new SCID.
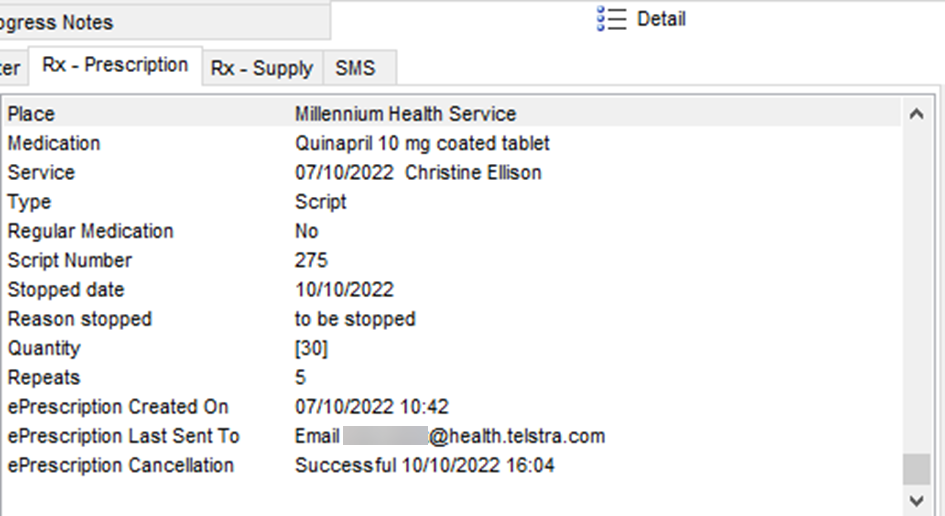
- ePrescription Created On date and time - the date and time at which this ePrescription was first successfully transmitted to eRx
- ePrescription Last Sent To SMS phone number | Email email address - the ePrescription format and the most recent phone number or email address to which the ePrescribing token was successfully transmitted via eRx
- ePrescription Cancellation Successful date and time |
Failed | Failed - PDS unavailable | Created |
Initiated - if this ePrescription was stopped
or deleted in Communicare, its status, one of:
- Created - the medication was stopped or cancelled in Communicare by the user
- Initiated - a cancellation or cease message has been sent to eRx, but no response has yet been received
- Successful date and time - the cancellation or cessation was successful
- Failed or Failed - PDS unavailable - the cancellation or cessation failed
Tip: To show deleted medications, in the medication list, right-click and select Show Deleted Items.
- If your printer assignment is set to PDF, and you chose to print tokens and the medication request, ePrescribing tokens are printed first, followed by the medication request when this process is complete. PDFs are saved to your Downloads folder.
- If your printer assignment is set to PDF, and you chose to print PBS Scripts and the medication request, two Save PDF File As windows are displayed, one after the other. Enter a name for each PDF file. A single PBS Script listing all PBS items is saved first, followed by the medication request.
Any medications that were not finalised, but were included in the new medication request are finalised when the medication request is created.
If you chose to create a medication request, it supersedes any previous medication requests and is listed in the Medication Requests window with a status of Active.
For medications that were finalised only, if custom prescription forms are enabled, and you chose to print the prescriptions, they are printed using your own template, otherwise they are printed on preprinted PBS forms.
If you created a medication request and your health service uses consolidated orders, you can now create a consolidated order.
To resend ePrescriptions or print prescriptions later that have already been finalised, in the clinical record on either the tab or the Detail tab, right-click a medication and select Reprint or Resend Prescriptions.
If you chose not to print the medication request when you finalised the medications, you can print it later from the Medication Requests window. For more information, see Add and print medication requests.